
Simply Lovely

By Cards

Hi All,

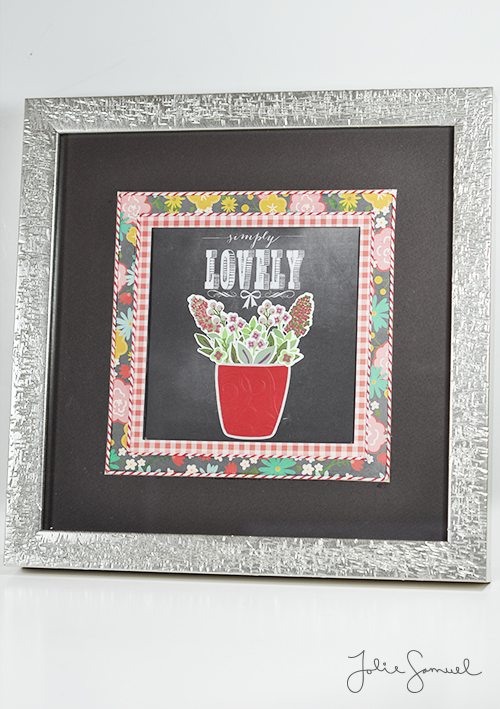
For today’s project I went back to my custom framing roots and created this framed wonder. It was originally an old 11×11 white frame with beige and black matting. It was nothing special but made of great materials. Truly, it was just begging to get a face-lift.

First I created my art using some wafer thin dies from W Plus 9’s Fresh Cut Florals. These stamps are very friendly to customization. It is one of the few stamps I have that you are able to layer images. If you notice, each element has been stamped multiple times to build layers.  It was my first try using them…and I am pretty much in love. I’ll have to mess around with them some more to see what else I can create.

Then I used some quality heavy weight designer papers to create some matting (matting is the border around the image) and added some trim to cover up the beige beveled edge that was previously on the mats.

To Jolie-fy the frame itself,  I painted it silver and dry brushed in some more silver. Then I took out some aggression and textured it like a maniac. No…not really. I did texture it, but I wasn’t angry.

I used one of my ALL TIME FAVORITE brands of glass cleaner to make the glass look like new (it was VERY hazed). If you have some mirrors or glass that is hazed from age, sun or any other weather…this stuff works wonders. Its the brand custom framers use to clean up some of the worst-conditioned frames that customers bring in.

And after ALL those steps….Here’s the final piece.

Simply Lovely Frame

Happy Birthday 2 U!

By Cards

Hi all,

How about a dimensional card today? This card is loaded with layers and textures. I wanted to play up the stamp and create a visual impact by using negative space for the stamp. I’ll admit there were many failed attempts on this card. For those of you that are crafters – DO NOT use glossy accents on images colored with stamp markers until those markers are absolutely 100% dry. I speak from experience (SO MANY SMUDGES!).

Happy Birthday 2 U

Supplies:

Card Base: Hero Hues Notecard – Neutrals

Paper: My Minds Eye , American Crafts Card stock

Embossing: Cuttlebug Dots Dry embossing

Stamp: Stampendous

Ink : Momento Tuxedo Black

Markers : American Crafts Stamp Markers

Circle Cutter: Martha Stewart Circle Cutter

Happy Birthday – Balloons

By Cards

Hi all,

For today’s card I wanted to play with some different techniques and I think the results are quite charming. The balloons were stamped on watercolor paper and colored in with watercolor pencils. I love working with pencils over a paint palette because it makes me feel like I have much better control on my canvas. I used a water brush to do my actual blending. The lacy designs on top and bottom were created using Japanese style washi tape.

Happy Birthday

Supplies:

Card Base: Hero Hues Notecard

Paper: DCWV & Strathmore watercolor paper

Stamp: Stampendous – Birthday Wishes

Ink : Momento Tuxedo Black

Watercolors : Derwent Inktense Pencils

Washi Tape: Recollections? (There was no label to be found on the package)

Post-It Book

By Planner Stationary & Accessories

Hi all,

Happy Tuesday! I’ve been working away in the craft room and doing a whole lot of creating. For todays post I wanted to share a quick picture of just a few of the post-it books i created. These turned out pretty cute! They’ve even got a little place to hold a mini pen. I made about 36 of these and each one is slightly different from the next. I think they would make a great little teacher/coworker gift.

Each measures approx. 4 x 4.25in. and hold a 3 x 3in stack of post-its. The best part is, they are entirely reusable since you can just stick down a new pad of post-its once you go through the first stack.

Post-it Book

Don’t forget to stop by tomorrow to see more creations!