
Stronger Together – Border Cuts

By Cards

CS4_participantHi All,

Welcome back to another day of clean & simple cards. Once again I was blown away by the amazing talent of cardmakers out there. This class has been phenomenal in teaching me all sorts of new techniques.

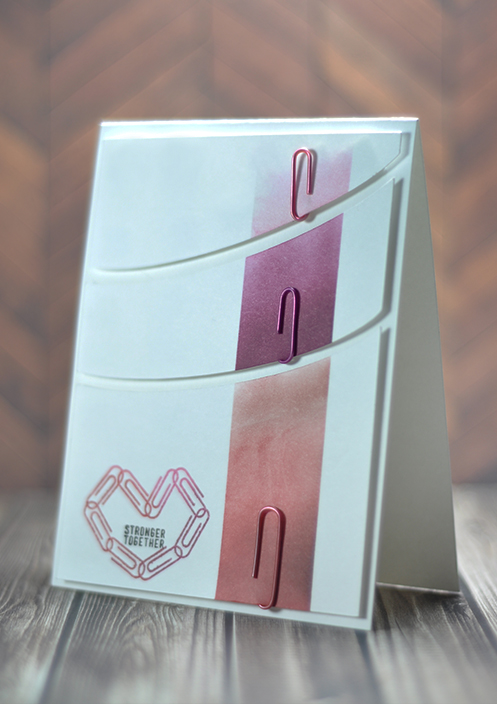
Today I wanted to try my hands at using a border to break up an image. I had a bit of a hard time coming up with a sentiment that would work, but found one that was a bit fun.

I used Hero Arts shadow inks to create the hombre look on each panel & a Simon Says Stamp set called Paper Hug for my sentiment. I loved the little paperclip heart and wanted to incorporate some paperclips into the design. I happened to have some colored clips on hand and thought it pulled everything together perfectly.

Here’s my card for day 2:

occ_paperclip_card

It’s a Good Day – Velveteen Stamping

By Cards

CS4_participantHi all,

I am LOVING this online class and have another project to share using a technique called velveteen stamping. It’s a type of double stamping where you stamp a solid background image ( I used white on white for my card) and then stamp directly on top of that using a pigment ink (I used floral stamps and Hero Arts Shadow Ink). I am fascinated by this technique and love the concept of a textured stamped image.

Here’s how my first attempts at this technique turned out. You can see the technique predominantly in the butterfly & larger floral pedals.

occ_doublestamped

Wishing You The Best – Colored Vellum

By Cards

CS4_participantHi all,

Today’s card was truly a challenge for me. I loved the technique of colored vellum shared in class and thought I would give it a try. I have quite a bit of vellum on hand but typically I use it with heat embossing and have never thought to color it with paints/watercolors. For this card I wanted to achieve some vibrant colors so I thought I’d paint using my Inktense pencils. The pencils worked fabulously with the vellum, but I did have a lot of paper curling. I think for future attempts, it would be best to tape down all edges and see if that helps in keeping the vellum flat.

Additionally, this card was created using 5 key elements (as that was the primary challenge of the day in the class). Here are the items I chose. Grey card stock, white vellum, a sheet of 6×6 designer paper, 1 sentiment stamp set & a set of Inktense pencils.

*I did use common tools to create the card such as a trimmer and adhesives.

occ_five

Here is my finished card.

occ_wishyou

Folding Card Ideas – 3 Fold Card

By Cards

Hi All,

I’m back with another card idea for you. This one is inspired by a book I received called “Folding Card Ideas (I believe you can find the book on Amazon). Although this  book is jam packed with card ideas & drawings, there are little to no instructions on how to create the cards. So I put together a little card sketch of this one & guide you through the assembly.

Here’s the finished look.

TriFold Card 1

Here’s a video on how it was created & the card sketch I used to create this card!

Supplies:

Cardstock: Bazzil Marshmallow white, Neenah Desert Storm, and Bazzil (teal textured)
Die-Cuts: My Minds Eye Birthday Girl & Birthday Boy Collection
Glitter Brush: Wink of Stella Clear
White Pen: Uniball Signo Broad White Gel Pen
Vellum: K&Co. Vellum Adhesives